Pages

.

Monday Odds & Ends


Happy Monday folks! I've had a very busy weekend. Lots of baking, errands, a birthday party, and a cracked rib from an over enthusiastic two year old jumping on my chest.

You know, the usual.

I've been busy with decorating science cookies for most of the weekend and will be wrapped up in their construction for most of today, and possibly tomorrow.

As icing dozens of cookies allows for little in the way of multitasking, I lack any suitable baked goodies to post today. However after a long weekend I feel as though I should post something, so I'm going to use this opportunity to get a couple announcements out of the way.

First off, I must metion this Medieval Stew from Inspired By Wolfe. Remember my post on medieval cooking? Well Inspired by Wolfe actually made the stew and posted it.

The result: amazingly edible.


The next thing I need to mention is something that I brought up in the comments section of one of my posts last week. Since there seems to be interest I'm going to go ahead and announce the...

Not So Humble Pie Contest

Okay, here is the deal. Next month I leave for London and will be staying with Mother Humble for a couple weeks. There will be travel time (18 hour flight with a toddler?! AHH!), jet lag, a completely different kitchen and many other obligations that will most likely reduce my weekly post count. I want to keep things lively around here for those weeks so I've decided I'll host a contest, a pie contest.

Fitting right?

While overseas I will be making a side trip to Morocco and I'll be picking up prize(s) for the contest. What? I have no idea. I'll figure it out while I am there but I can assure you they, like most Moroccan handicrafts, will be quite spiffy.

To enter your pie you'll need to email me at least one photo of the pie and a recipe to my email address (notsohumblepieblog@gmail.com). You can also include any interesting anecdote or history related to the pie, or talk a bit about your own blog if you're a food blogger. That's right, I'll plug your blog.

I myself read a lot of food blogs and I've noticed some really great blogs are ridiculously underexposed. I thought this would be a good chance to showcase some of the food blogs run by my readers. After all, we're one big happy blogging community, right?

So yes, whatever commentary you would like to accompany your pie I can probably work into the post.

Within reason of course. If you send me a 30 haiku poems devoted to Hannah Montana along with your pie, I might take issue with that.

Try to keep it limited to a maximum of 5 teen pop idol poems. Okay?

Thanks.


What am I defining a as a 'pie'? Anything in a crust with a filling. Tarts, hand pies, cheesecake, quiche, etc. Sweet or savory, if it has a crust and something inside then I'll consider it a pie. It can be your own recipe or from your favorite cookbook (as long as the instructions are in your own words).

It just can't be humble. No humble pies allowed.

If you're interested in entering, do send me an email or post a comment here letting me know you might bake something. That will help me plan ahead for next month. That isn't a requirement to enter, though. You can enter via email anytime between now and May 15th.

Winners will be chosen in a completely arbitrary fashion by me when I return from London. I'll give weight to photography, recipe, reader comments (possibly a poll too) and the pie's general lack of humility. For the sake of postage, I must limit prizes to US, Canada and the UK (unless I manage to find a prize what won't cost $75 to mail to the Maldives etc).

Sound good? Then go forth and bake!
reade more... Résuméabuiyad

Lime Tart & The Humble Kitchen

Humble Kitchen Mascots
Le Monde newsprint paper-mâché
They Rock

Over the last few months I've been asked to post photos of my kitchen or do a 'tour'.

So today, while doing my morning baking, I stepped back from the counters and snapped a few photos.

Well, after thoroughly cleaning the ridiculous number of stainless surfaces. It is now quickly reverting back to its natural, fingerprint smudged state.


The kitchen lacks a lot of knickknacks--apart from the chickens--so it is a little low on the personality-scale. While polishing today and taking in the general look of the kitchen, I felt the impulse pull out all the pretty jars of legumes I keep in my pantry and arranging them artfully on the counters.

Then maybe some containers of spices, a couple cake stands, or cutting board with some colorful bell peppers...

I nipped that craziness in the bud. Staging a kitchen seems silly, even to me.

Instead, I just got about my morning. A simple crumb cake for the family and a tart for today's blog post.

At least I have a crumb cake in process. Perhaps not as pretty as some bell peppers but a whole lot more realistic.


Also, these blow up pretty large. Try not to examine the baseboards too carefully. I do have a toddler...

So today's tart!


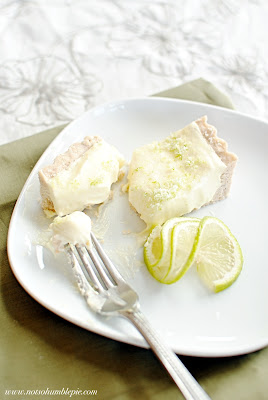
Okay, so I messed this dessert up a bit. Not the making of the dessert itself, but I did help myself to a slice before it had enough time to fully chill.

I was not exactly rewarded for my impatience with good photographs. I have the rest of the tart chilling now, if the light holds out perhaps I can update the post with a few properly chilled slices.

Regardless of the less than flattering photo, the tart is lovely. It reminds me of a sour cream lemon pie, only with lime and less acidity due to the use of cream. It also sits on a brown butter crust which lends the tart a very nice nutty fragrance.

So, it smelled good, it looked good, and I knew it tasted good...

I wanted a piece. Immediately.

A recipe for photography-disaster.


Lime Tart With Brown Butter Crust
from Luscious Creamy Desserts

Lime Curd
1/2 cup unsalted butter
5 large egg yolks
1/2 cup granulated sugar
1/2 cup fresh lime juice (roughly 2-3 medium limes)
zest of one lime, finely grated
pinch salt

3/4 cup heavy cream

Brown Butter Crust
6 tablespoons unsalted butter
2 tablespoons sugar
1 1/2 cups all purpose flour
1/4 teaspoon salt

Lime Topping
2 teaspoons granulated sugar
1 teaspoon lime zest


Lots of left over egg whites. I think we might be in for some macarons soon...

Start with the curd, as it will need time to chill after cooking.

Melt the butter over medium low heat in a medium sauce pan. Remove from heat and whisk in the sugar, lime juice, zest, salt and eggs. Return to the heat and cook, stirring frequently for 10-15 minutes, until the curd has thickened and coats the back of a spoon. Do not allow the curd to boil, if it begins to steam pull it off the heat and stir to cool it down.

Place a fine sieve over a bowl and strain the curd. Cover the curd and place in the refrigerator to cool completely (at least 2 hours).


For the brown butter crust, pre-heat your oven to 350°F and ready a 9" tart pan. (I'm using a rectangular tart simply because my round tart is holding yet another tart at the moment.)

Place the butter into a skillet and melt over medium/medium-low heat. Allow it to cook without stirring until the butter is golden brown and has a warm, nutty fragrance.

Meanwhile, combine the salt, sugar and flour in a small mixing bowl. When the butter is ready, pour it into the bowl in a steady stream while stirring with a fork. Mix well and then pour the crumbs into your tart pan.

Press the crumbs into the pan to form the crust. Stab the crust liberally with a fork and bake for 20 minutes until light golden brown.

Pull out of the oven and allow to cool on a wire rack completely.


When both the crust and the curd are cool you can fill the tart.

Beat the 3/4 cup of heavy cream to stiff peaks and then add the lime curd. Beat in the curd until just incorporated and then pour into your crust. Smooth with an offset spatula.

Lightly cover the tart and chill for 4 hours.

Or, if you're me and you've been running your finger inside of the bowl and eating the extra filling, you want a slice now so you rush ahead...


Make the topping by blending the sugar and lime zest into a fine powder in your food processor or blender.

Just before serving, sprinkle the tart with the lime sugar.

Enjoy!

reade more... Résuméabuiyad

Pets de Nonne (Nun's Farts)


Pets de Nonne! Translation: Nun's Farts.

Proof positive that the French have a great sense of humor.

Today's treat: choux fritters dusted with powdered sugar. So simple and delicious, you'll quickly forget about any and all associations with flatulence.

Maybe.

I really enjoy them for breakfast, served with a little homemade jam or lemon curd. If I want to be really sinful, I'll serve them with a rich cup of hot chocolate. That is, hot chocolate like I once had in Rome, thick like molasses and perfect for dunking.

Mr. Humble prefers his pets de nonne drizzled with a little pure maple syrup.

So, how do you like your nun's farts?


Yea, this is going to quickly devolve into a fart joke post if I'm not careful.

Maybe I should just get to the recipe today.

This is a simple variation on choux. If you're not a fan of the slightly eggy taste of choux, try flavoring the dough with cinnamon, nutmeg, or my personal favorite, a little lemon zest.

Pets de Nonne
yields 4-6 generous servings
1 cup water
1/2 cup butter (cut into pieces)
1 cup flour
1 cup eggs (roughly 4 large eggs)
1 tablespoon granulated sugar
1/2 teaspoon vanilla extract

oil for frying

Bring the butter, sugar and water to a boil over medium-high heat. Reduce the heat to medium and add the flour all at once. With a wooden spoon, vigorously stir the mixture. It will start out as a sticky mess but will turn into a glossy lump of dough that pulls away from the sides of the bowl.

Transfer the dough to a bowl and beat using hand beaters (you can also you use a stand mixer with the paddle attachment) for a minute on medium speed to cool the dough a bit. Then add the vanilla and eggs, one at at a time, beating on high speed to incorporate. Once the dough goes from wet and slippery to sticky, you can add the next egg.

Once all the eggs are mixed, transfer to a large zip top bag. Cut off the corner to produce a 1/2-3/4" in diameter opening and you're ready to go.

Heat a couple inches of oil over medium/medium-high heat and pipe 1" blobs of the batter into the oil. Give them a quick stir with a wok skimmer or whatever slotted frying implement you generally use to prevent them from sticking together.


You will most likely have more batter than room to fry, so feel free to cook the fritters in batches.

Allow the pets de nonne to fry for several minutes until golden brown and cooked through. Drain onto paper towels and allow to cool slightly. When they're no longer blistering hot, dust with powdered sugar and serve warm.

reade more... Résuméabuiyad

Chocolate Meringues


I love meringues.

They're easy to make, require ingredients I always have on hand and best of all, they're something I can make and eat without much guilt.

A welcome experience around here, let me tell you.

In fact, I'll calculate and share the nutritional information for these cookies. The whole batch should contain less than 880 calories, less than a gram of fat and makes roughly 50-60 cookies. Meaning each cookie is roughly 15 calories, virtually fat free and packs a big chocolate flavor into a little cookie package. Win!

These are probably the lightest treat to make it onto my blog but sadly, I had to find a way to make them a little less reasonable. At the last moment I compulsively decided to sandwich the light crisp cookies with a little melted chocolate. Woops...


Chocolate Meringues
from Cookies

4 large egg whites
1 cup sugar
pinch cream of tartar
1/2 teaspoon vanilla extract
1/4 cup unsweetened dutch processed cocoa (I recommend using extra dark cocoa)

Preheat your oven to 175°F.

Prep a pastry bag with a large star tip (like an Ateco 825) or if piping bags are not your style, cut a half-inch in diameter opening in the corner of a zip top bag. Line 2 baking sheets with parchment or silicone baking mats.

Combine the egg whites, sugar and cream of tarter (you can omit the cream of tartar if using a copper bowl) in a large heatproof bowl set over a pan of simmering water. Whisk constantly over the water until the sugar has dissolved and the mixture is warm to the touch (roughly 3-4 minutes). Then remove from heat and beat the whites with a hand mixer or your stand mixer, starting on low speed and gradually increasing until stiff, glossy peaks form. Add the vanilla and mix to combine.

Sift the cocoa over the meringue to break up any lumps and then fold until no streaks remain. Add the mixture to your pastry bag and pipe rows of quarter sized meringues onto the pans.

Bake for 2 hours, until they lift from the pan easily. Allow to cool completely.

To sandwich, melt a few ounces of your favorite chocolate and fill a zip top bag. Cut a small opening and pipe small blobs of chocolate onto each cookie. Given their awkward shape, this is best done with the meringues upside down on a baking rack. Allow the chocolate to cool for about 10 minutes and then top with a second cookie. Allow the filled cookies to sit for a couple hours or until the chocolate has set completely and then store in an air tight container for up to two days.

reade more... Résuméabuiyad

The Trauma Of Raising Yeast

My sourdough starter is starting to make me feel bad.

I've been taking such good care of my little pot of yeast and I am so proud of it. Every day I take charge of feeding it, watering it, keeping it warm and it grows, bubbles and thrives under my care.

This makes me feel quite aware that my Mr. Stinky is a living breathing thing.

(Well... things)

Now the anthropomorphized Mr. Stinky is making me feel really guilty about his care routine.

I can see him over there, giving me the yeast stink eye....

Allow me to explain in web-comic form:


>


I'm so sorry, Mr. Stinky!
reade more... Résuméabuiyad

Hazelnut Paris Brest


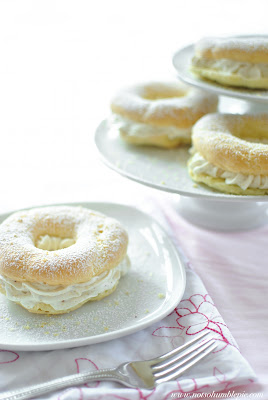
Hung over from eating all your kid's Easter candy? I am... blasted Cadbury Eggs! Don't worry, I've got a little sugar 'hair of the dog' to sooth you.

Hazelnut Paris Brest

No, not breast. What sort of blog do you think this is? Brest, the town in France.

There is a cycling event--one of the oldest events of that type still routinely run--from Paris to Brest and then back. The Paris-Brest is also a pastry created to commemorate the event in the late 1800's and is said to resemble the tire of a bicycle.


Or perhaps the round trip between the cities... whatever. To me, it just represents happiness. Which is what results when you consume such a light and creamy pastry laced with praline.

So. Good.

Traditionally, the pastry it is made with almonds, but we're going to use hazelnuts today.

I was inspired by the recipe in Luscious Creamy Desserts, though I admit that apart from the idea and the praline, I used little else. Creamy Desserts uses a milk pâte à choux, a recipe I've never had much luck with, so I went with the traditional flour, water, butter, eggs choux. I also used my ol' reliable pastry cream recipe.


A quick warning: Making this dessert is a bit of a marathon, so keep that in mind before attempting. While each of the component parts are not terribly difficult, there are so many that it can require some stamina.

Lets start with the praline.


Hazelnut Praline
adapted from Luscious Creamy Desserts
1 cup hazelnuts
1 1/2 cup granulated sugar
1/2 cup water
1 tablespoon corn syrup (liquid glucose)
1 pinch salt

Start by preheating the oven to 350°F. Arrange the nuts on a baking sheet and toast for roughly 10-15 minutes until fragrant and they take on a light golden blush.

When done remove as much of the seed coat as you can (I rub the cool nuts between my palms) don't fuss over this step too much. Some seed coat on the nuts isn't the end of the world.

Spray a wide shallow heat proof bowl with a little nonstick spray and place the nuts inside. Now you're ready to start making the candy

Over medium heat, combine the remaining ingredients into a small heavy bottomed sauce pan. Stir until the sugar is dissolved and then allow it to boil untouched. You can wash down the sides of the pan occasionally with a damp pastry brush.

Now stare at your sugar. Yes, stare at it for roughly 10-15 minutes (don't rush it by turning up the heat). The water is going to boil away concentrating the syrup and then the sugars will begin to caramelize. This last step occurs quickly, which is why you must watch it. The length of time between the a perfect praline and a mess of burnt sugar isn't long, so don't be tempted to step away from the stove. When the sugar starts to take on color, give the pot a gentle swirl to keep the color uniform. When the sugar turns a medium amber color pull it off the heat and immediately pour it over the nuts in the bowl.

Once cool you can break it into chunks. Place those chunks into a sturdy zip top bag and smash them into smaller bits with a rolling pin. Then grind the bits into powder in your food processor.

Store the powder in an air tight container in your freezer (it won't keep at room temperature). This recipe won't require all the praline, but you'll find that it has plenty of uses (from topping ice cream to adding a sweet crunch to homemade chocolates).


Don't be intimidated by the french name, making choux is really quite simple (I was making choux before I could drive a car). With this base you can create cream puffs, eclairs and any number of other goodies.

Pâte à Choux
1 cup water
1/2 cup butter (cut into pieces)
1 cup flour
1 cup eggs (roughly 4 large eggs)

Bring the butter and water to a boil over medium-high heat. Reduce the heat to medium and add the flour all at once. With a wooden spoon vigorously stir the mixture. It will start out as a sticky mess but will turn into a glossy lump of dough that pulls away from the sides of the bowl.

Transfer the dough to a bowl and beat using hand beaters (you can also you use a stand mixer with the paddle attachment) for a minute on medium speed to cool the dough a bit. Then add the eggs, one at at a time, beating on high speed to incorporate. Once the dough goes from wet and slippery to sticky, you can add the next egg. (Some folks prefer to do this entirely by hand, however the rise from the choux will not be quite as good.)

Once you've added all the eggs you can add the dough to your pastry bag. I'm using an Ateco 809 to pipe these, if you don't have that large of a tip, go ahead and use a Ziploc bag with a cut corner (you'll want an opening almost an inch in diameter).

Pre-heat your oven to 425°F and line two sheet pans with parchment. You'll want to pipe 8-10 circles onto the sheets (you can trace the rim of a 3" glass on the paper as a template), remembering that the rounds will expand quite a bit during baking.

Once the oven is preheated, place a pan inside and reduce the heat to 350°F and allow to bake for 30-35 minutes.

Once done, remove from the oven and transfer to a wire rack immediately to cool.

When cool, cut the rings in half (if there is any moist uncooked pastry inside, remove it) and you're ready to fill with your hazelnut praline cream


Hazelnut Praline Cream
pastry cream adapted from Baking and Pastry: Mastering the Art and Craft
320 mL whole milk
75 grams granulated sugar
28 grams unsalted butter
28 grams cornstarch
113 grams of eggs (roughly 2 large eggs)
5 mL pure vanilla extract

2 cups (480mL) heavy cream
roughly 1 cup of hazelnut praline powder (more or less to your taste)

Combine 240mL of the milk and 33 grams of the sugar into a heavy bottomed sauce pan. Add the butter and bring to a boil over medium heat, stirring to dissolve the sugar.

Meanwhile, in a bowl whisk the cornstarch with the remaining milk and sugar. Add the eggs and vanilla extract and mix until completely smooth.

When the milk comes to a boil remove from heat immediately and pour a third of the hot milk into the bowl with the eggs and cornstarch while mixing with the whisk. Return this mixture to pan with the remaining hot milk and set over medium heat stirring constantly with the whisk.

Cook the mixture until it comes to a boil, has thickened and the whisk leaves a trail in the mixture.

Pour the mixture into a stainless steel bowl set into an ice bath and allow to cool, stirring occasionally.

Once the mixture is cool, beat the heavy cream to soft peaks and then gently mix one third of the whipped cream into the pastry cream along with the praline powder. Fold the remaining cream in until no streaks remain.

Pipe the mixture into your pastry and place the second half on top.

Serve with a dusting of powdered sugar and a sprinkling of the praline powder.


Mr. Humble ate half of them while I was photographing. I kept having to rearrange the shoot to make up for the lack of pastries I had in the background. He wants me to make them again... ugh. Maybe for his birthday.

Maybe.

reade more... Résuméabuiyad

Wild Yeast


Doing another little 101 of sorts. Today's post is on how to create your own sourdough starter.

I decided I would let Mr. Humble guest blog for this one, since he is my resident microbe expert and because he thinks he knows a thing or two about bread. After making phenomenal panini with his amazing wild yeast focaccia, I can't do anything but agree with the man...

~Mr. Humble~

Ms. Humble asked me to write up a guide on starting your own natural yeast starter and I quickly agreed (I don't want to get into trouble).

Making one is very easy, though you wouldn't know that from reading most of the information about it on the Internet. Not only is there virtually useless information, but there is also exceptionally bad advice. I will cut through all that, explain some possible pitfalls, and give you what you need to know to create your own natural yeast starter.

Why do you want a natural yeast starter? One pretty good reason is that it is cool to say you do. People will be envious. They will ask how you did it and say they wish they could make bread. You can then magnanimously offer them a portion of your starter (you don't have to tell them you toss out gobs of the stuff if they don't take it.)

I do not know if any of the supposed health benefits of using a natural starter are true, as I haven't bothered to do a literature search. It could be pure quackery, simple truth, or a happy medium. It doesn't matter. A real reason to use a natural starter is because of the bacteria
Lactobacillus. As the Lactobacillus bacteria grow, they create an acidic environment hostile to many other organisms (the icky ones you don't want), except for strains of acid-tolerant yeast. This helps the bread's texture, shelf life (it won't turn into a hard brick after 12 hours on the counter), and imparts a distinctive flavor.


The Only Natural Starter Recipe You Really Need
(This makes a 100% hydration starter)
100g Whole Wheat Flour
100g Water (roughly room temperature)

You do not need any of those things you occasionally see called for on the internet: sugar, potato/pasta starch water, bits of vegetables, or store bought yeast. Just flour and water. The wheat comes with its own wild yeasts, the nutrients to feed it. All you have to do--as cliche as it sounds--is add water.


Select your container, one that can hold three times the volume of finished mixture (once active, the starter will double in size). I use mason jars for maintenance and larger plastic storage containers for bulking up the starter before making bread. Weigh out the water. Add the flour. Stir until well mixed. Cover with plastic wrap or anything that will keep the moisture loss low and can allow for the escape of gas. Let stand at 20°C (68°F) to 27°C (80.6°F), with an optimum at closer to 26°C (78.8°F). This is the range of temperatures which encourage yeast multiplication, which is what you want. For more detailed information, click
here.

The mixture will be thick and a bit lumpy at this point. But don't worry, it will quickly turn into a globby, bubbly mess and stay that way.

12 Hours:

At around 12 hours, take a look at how the starter is doing. If it is a little bubbly, nor not bubbly at all, give it a good vigorous stirring to oxygenate the mixture, and let sit for another 12 hours. If it is very bubbly and kind of gooey, then you will want to begin feedings.

For the first couple of days, the
Lactobacillus have yet to establish themselves and create the proper acidic environment, so you have a mixture of bacteria and some yeast. So even if your starter is bubbly, it might smell a little off because it isn't ready. But it will get there.

Feedings:
50g Starter
50g Flour
50g Water

Stir the starter and measure out 50g (discard the remaining starter or find someone else to pawn it off on). Mix the 50g of starter with the 50g of water. When dissolved, add the flour and stir vigorously to mix well.

You will feed your starter every 12 or 24 hours when kept at the temperature ranges above. How often depending on how it grows or how fast you want to get it up to speed. Regardless of how often you feed it, you will not want to use it before 5 or 6 days. Mind you this is 5-6 days of the starter behaving appropriately (i.e. rising to nearly twice its size after each feeding). If your starter cant double itself, it is going to have a very hard time doubling the volume of your dough.

To determine when the starter can be fed, it should have doubled in size (or nearly so) indicating a rapid growth phase. Many suggest feeding it when it collapses or when it begins to collapse. That works OK, but in doing so, you risk a lag of up to a few hours before the yeast get back into a high growth phase. That is fine when you are merely maintaining a starter, but for the initial production, I prefer to feed it before it collapses and the growth rate is still high.


24 Hours:

If at 24 hours you still have no bubbles, you might need to start over. There are a variety of reasons why you didn't get anything, or you got something you suspect is very wrong. I suggest simply trying again, but if it doesn't work the second time, try the troubleshooting tips below.


Possible Problem 1: Your flour was bleached or otherwise processed too much. Bread makers tend to go for unbleached, organic flours to get the starter going because they are less likely to have been highly processed and thus still have plenty of natural yeasts. This is easy to fix. Buy organic whole wheat flour. You can switch to all purpose after a few days.

Possible Problem 2: Your water is highly chlorinated. Depending on how chlorinated the water is, the fix is either simple or complicated. If your municipality uses chlorine to treat the water, the chlorine can be removed by letting it sit out for a couple days on the counter. If the water contains chloramines (another form of chlorination), then that will not work, as they are rather stable. If that is the case you can use bottled drinking (not distilled) water. I myself use tap water and haven't had a problem.

Possible Problem 3: It was too cold. Try again, but keep the starter a little warmer.


48 Hours:


You should have a pretty happy little starter and the smell should be pretty developed. It should be active and bubbly and routinely double in size several hours after being fed. At this point and you can switch the feedings to all purpose flour to create a white wheat starter.


Maintaining Your Starter:

Well, I haven't been doing this long, but it isn't hard. Take a little, add equal parts flour and water, put it back. When I want to use it, I just increase the amounts of starter, flour, and water I add so that I will have enough for my batch of dough. When the leaven is strong, you can add 2 or 3 times as much flour and water as you do starter, as long as the flour/water ratio stays the same (ex. 100g starter, 200g flour, 200g water).


I keep mine on the counter because we've been using it a lot. If you will not use it frequently, I would feed it, put it in the refrigerator, and then take it out, at most, weekly for feedings. Some say every 2 or even 3 weeks, but I like a strong, capable starter, so I'm not taking any chances.


If you do refrigerate it, you will probably need to feed it normally for a couple of days to make sure it is very active.


Using Your Starter:


Your starter should be ready to use in 5-6 days. As long as the starter dough is fed flour and water daily, the sourdough mixture can stay at room temperature indefinitely and still remain safe and usable.


I'm not going to talk about bread recipes here, but you should know that using a starter requires some planning. You need to stop discarding the starter to build up your supply. You will want to keep the ratios the same (one part starter, one part water, one part flour by weight) for a few days and soon you will have a bucket of starter ready to go. The day you wish to bake with your starter, I advise you use it when it has doubled and before it falls. Meaning you don't want to feed your starter and then immediately use it, you need to give it time to eat and multiply.


Without naming names, I will list two of the more horrifying things I saw being advised on the internet while researching my own starter.


If you discover your starter has mold or black liquid on it. Don't just pour it off and soldier on. Your starter should not contain anything that looks darker or hairier than what you put into it. Flour and water are not dark and hairy. If your container starts to contain dark fluid or fuzz of any kind, discard immediately and begin again. And for the love of all things good in the world, do not use it to make bread.


A starter is not a fish. Do not sprinkle flour on the top of your starter as if little yeasts are going to dart to the surface and gobble it up. The yeast will die off and that creates an environment in which mold can grow (see above). Unfortunately, feeding your starter is more involved than just tossing a few pinches of flour at it.


There you go.


With this you should have all the tools you need to tend your little pot of wild yeast. You can even name it, like our Mr. Stinky.

reade more... Résuméabuiyad