Pages

.

Blackberry Lime Cheesecake


Don't panic, I survived the spider bite!

Generally I am in the habit of blogging here at least 5 days a week, however the entirety of yesterday was spent with Father Humble trying to rescue data off one of my dead hard drives. After no less than 15 hours of work, we--well he--was successful. I have all my data back and I should probably burn my years of precious photographs to disks rather than relying on these temperamental external drives.

So! Fortified by my good fortune, I'm back in the kitchen today and turning out goodies once again. Today's treat: Lime Cheesecake with a Blackberry Swirl. I just love the combination of blackberry and lime. It is sweet, tart and creamy.

I was itching to make mini cheesecakes (nothing to do with the spider bite) and decided to put my 4" springforms to use. However, since I know that is a rather uncommon pan size I'll post the recipe for this cheesecake in 10" form. If you DO have lots of mini cheesecake pans lying around, then feel free to divide among your pans (though you may need up to 50% more crust to make multiple minis). This recipe makes roughly eight 4" cheesecakes or one 10" cheesecake.


Not So Humble Lime Shortbread Crust

1 1/2 cups all purpose flour
1/2 cup powdered sugar
3 tablespoons cornstarch
1/4 teaspoon salt
9 tablespoons cold unsalted butter, cut into pieces
2 teaspoons lime zest

In a food processor, combine the starch, flour, sugar, salt and butter and pulse until the mixture resembles a coarse meal. Pulse in the zest, if using and then pour into a 10" springfrom pan.

Press the crumbs into an even layer at the bottom of the pan and half way up the sides to form the crust. Place in the freezer and then preheat your oven to 350°F with a rack in the lower third of the oven.

When the oven is hot pull the crust out of the freezer and bake for 15 minutes. Allow to cool on a wire rack.


Not So Humble Blackberry Lime Cheesecake

32 ounces cream cheese (at room temperature)
1 3/4 cups granulated sugar
1 1/2 teaspoons vanilla
1 tablespoon all purpose flour
1/2 cup sour cream (at room temperature)
4 large eggs (at room temperature)
2 tablespoons lime juice
2 teaspoons lime zest

2 cups blackberries
simple syrup
splash lemon juice

boiling water

Preheat your oven to 350°F with a rack set in the lower third of your oven.

Start by making the blackberry sauce: In a food processor combine the blackberries with the splash of lemon juice and enough simple syrup to make a slightly thick slurry. Strain the mixture and collect the juices (this is optional, sometimes I use the whole fruit) and set aside, discarding the remaining solids.

To make the cheesecake, beat the cream cheese for roughly 4 minutes on medium speed until smooth in your stand mixer with the paddle attachment. Slowly pour the sugar into the cream cheese scraping down the sides of the bowl. Add the vanilla, lime zest and sour cream. Sift the flour into the mixture. Reduce your mixer's speed to low and add the eggs one at a time, mixing until each one is just incorporated taking care not to over beat the mixture.

Pour the mixture into the pan with the crust. Pour the blackberry mixture into a plastic sandwich bag and cut off enough of the corner to pipe a 1/4" - 1/2" ribbon of sauce. Pipe parallel lines of the mixture across the top of the cheesecake. Using a skewer or toothpick, drag it through the batter perpendicular to the lines in a zig zag to create the marbling effect. You can also just swirl the toothpick for a more abstract design.

Set the cheesecake on to two large sheets of aluminum foil and smooth them up the sides of the pan, making it water tight. Set the cake into a deep roasting pan and place in the oven. Carefully pour boiling water into the roasting pan. About an inch of water works fine, but don't pour above the lowest edge of your foil. (Note: If you're making mini cheesecakes, you can skip the water bath. Simply place a rack in the lowest part of your oven--below the cheesecakes--and set a pan of boiling water onto it. This will keep the humidity in your oven high and help keep the heat gentle.)

Bake for approximately 60-70 minutes until cake is set but center is still slightly wobbly. Turn off the heat and allow to cool in the oven with the door ajar for roughly 20 minutes. Carefully remove the roasting pan from the oven and set the cheesecake onto a wire rack to cool (You'll need to be particularly gentle when handling a marbled cheesecake, as the topping has weakened the surface tension on the cake and they can be prone to cracking). Once the cake is room temperature chill for a minimum of 4 hours, ideally overnight.

Enjoy!

reade more... Résuméabuiyad

'You Could Be In Paris' Lemon Tart


I wish I was in Paris.

Not digging through the storage bins looking for one of my ancient hard drive backups. Bonus: I've learned that rummaging through boxes in the garage while wearing a skirt is a bad idea.

You see, some mysterious insect bit one of my bare legs while I was digging around out there. I'm trying not to think of which of the loathsome skittering creatures I saw today it could have been. Luckily, there is nothing dangerous (e.g. poisonous) lurking in Seattle garages. Still, that isn't stopping my leg from reacting as if it had been attacked by a swarm of killer bees.

Paris, yea... that would be nice.


You know, pastry is incredibly therapeutic. It's a scientific fact.

If course I'm not in Paris. I'm not lounging outside a parisian bakery sipping coffee and eating my body weight in butter laden pastry.

I'm in Seattle... with really peeved spiders. So, I'm soothing myself with the next best thing: big slices of this tart.


And it is wonderful. This is probably one of the best lemon tarts I've ever had.

It really is helping cheer me up. Though it is doing little for my leg...

The 'You Could Be In Paris' Lemon Tart
(AKA The You Could Be In Paris Not Getting Spider Bites Lemon Tart)
from Luscious Lemon Desserts
serves 10

1/2 cup unsalted butter
2 tablespoons finely grated lemon zest
1 3/4 cups all-purpose flour
1 1/4 cups granulated sugar
2 pinches of salt
6 large eggs
1 cup fresh lemon juice
1/2 cup heavy cream

Confectioners' sugar for dusting

Preheat your oven to 350°F and position a rack in the lower third of the oven.

Melt the butter in a small sauce pan over medium low heat. Stir in one tablespoon of the lemon zest and allow to stand for 5 minutes. Combine the flour, 1/4 cup of the sugar and a pinch of salt in a bowl or your food processor. Pour the butter into the bowl in a fine stream, mixing with a fork until well blended and it holds together when pinched. If using a food processor, blend the ingredients and then pour the butter into the feed tube and blend for roughly a minute.

Empty the mixture into an 11" tart pan with a removable bottom and press it with your fingertips to evenly line the sides and bottom.


Bake the crust for 20 minutes, or until it is a light golden brown. Allow the crust to cool on a wire rack while making the filling.

Process the remaining one cup of sugar with the remaining one tablespoon of lemon zest in your food processor for about 2-3 minutes, until the zest is finely ground.

Pour the sugar into a bowl and add the eggs, lemon juice and a pinch of salt and whisk until smooth.

Beat the 1/2 cup of heavy cream to soft peaks and then whisk the cream into the sugar/egg mixture until just blended. Pour this mixture into your still warm crust and bake for 20-30 minutes, until the filling is just set in the center.

Allow the tart to cool completely.

Just before serving, dust generously with powdered sugar, cut into wedges and enjoy.


Back to eating my therapy tart and occasionally scratching my very itchy leg.


Time for another slice...
reade more... Résuméabuiyad

Why does technology hate me?

Today's post is going to be late. I have a couple dishes lined up to post but it seems Blogger doesn't want to cooperate. I can't post any images and frankly, this blog isn't the same without pictures.

Besides, I seem to have a crisis on my hands. One that goes far beyond not being able to upload photos...

While crafting my post for the 'You might be in Paris' tart I noticed that all of my Paris photos were gone. In fact, all my travel photos are nowhere to be found! Apparently, my external back-up hard drive is having some issues.

No worries, I've got a second external backup drive... which I plugged and it started making these ghastly noises. Ever given a cat a bath? Yea, it sounds like that.

Now, I'm not a trained computer technician, but I reckon that's bad.

You know what the most annoying part of this is? One of these drives is brand new because a previous back-up hard drive also imploded a few weeks back.

Why does technology hate me?! WHY?!

I'm going to go cut myself a big fat slice of my Paris-tart and try to figure out how I'm going to resurrect one of these drives.
reade more... Résuméabuiyad

Chemistry & Beauty: Copper Bowls


I have a new toy coming and I am so excited! I've finally (wo)manned-up and invested in one of those gorgeous copper bowls. Mr. Humble is tolerating the extravagance fairly well, though I fear he will use this purchase to justify his own craving for new speaker stands. Men and their silly toys...

Anyway, for a while now I've resisted the siren's call of the gleaming bowl. I've always justified my reluctance with the idea that copper was high maintenance, had limited uses or was too expensive.

However, since reading about the advantages of copper, coupled with my obsessive quest for the perfect macaron, my resolve was as strong as over-beaten egg whites. (Unforgivably terrible egg joke, I know.)

I decided I needed to test the beneficial properties of copper as part of my Macaron 101: French merigue. After all, in the quest for perfect macarons, I'll do just about anything.

When it comes to egg whites, the bowl you beat them in does make a difference. Allow me to demonstrate the relative 'awesomeness' of bowls when it comes to whipping eggs into a light fluffy meringue:


Want a light fluffy meringue? Then you will want to reach for copper or stainless before plastic or aluminum. Mud is an all around bad choice, unless you're lost in the wilderness and you absolutely need to make some meringues so the woodland creatures don't turn on you.


So why is copper so great? Chemistry!


Unlike all those other bowls, a copper bowl reacts on a molecular level with the egg whites to help form those perfectly divine fluffy whites.

Egg whites are made up primarily of proteins and water, copper contains an ion that migrates from the bowl and reacts with a protein in egg whites, strengthening them. With the addition of the copper ion, the egg white proteins create a more stable foam that is harder to over beat and less likely to unfold.

Whipping egg whites is often likened to blowing up a balloon. For a voluminous meringue you need to beat in the amount of air the proteins can handle. Beat too much air into the whites, the balloon will pop and you need to start over again. Of course, if you're beating tough copper infused whites, you are starting out with a much stronger balloon.

I want tenacious meringues. So there was no question of what I needed to do...

I cracked open my wallet and went shopping.

I'm eagerly awaiting the arrival of my shiny new Mauviel bowl. Will it stand up to some rigorous testing for the next Macaron 101?

We shall see...

reade more... Résuméabuiyad

Hey! Where's My Swan Neck Pudding, Wench?

I stumbled across two 15th century cookbooks this week! If that isn't a neat foodie-find I don't know what is.

So I've been reading through these cookbooks and I'm amazed at what they ate. There are some interesting things on the menu, and I'm not just talking about ol' Vlad:


Medieval banquets included now-uncommon meats like porpoise, seal, whale, peacock and swan.

I know what your thinking, finally a cookbook to tell me what to do with all these exotic dead animals I previously had no had recipes for!

Too many swan guts laying around needed a use? Why not try some delicious Chawdwyn?

Take Gysers, lyuers, and hertes of Swannes, or of wilde gese; And if þe guttes be fatte, slytte hem, and cast hem there-to, And boile hem in faire water; And then take hem vppe, And hew hem smale, and caste into þe same brotℏ ayene, but streyne hit þorgℏ a streynour firste; And caste thereto pouder of peper and of caneƚƚ, and salt, and vinegre, And lete boile; And þen take þe blode of þe swan, and fressℏ brotℏ, and brede, and drawe hem þorgℏ a streynour and cast thereto, And lete al boyle togidre; And þen take pouder of Gynger, whan hit is al-moost ynougℏ, And caste there-to, And serue it forthe.
Swan bits with blood and ginger.

Om nom, right?

Now I'm thinking, about about the menu at Medieval times? What gives there? Where is the Chawdwyn?

Of course, I'm referring to the is a chain of dinner theaters in the U.S. which offer dinner featuring staged medieval-style games, 'sword-fighting', and jousting followed by a 'tournament'.

To my European and UK readers who were not aware of this silly concept, we Americans are strange... but you probably already know that.

photo credit: Phil Guest via Wikipedia

For the poor souls who have not had the pleasure of dining at Medieval Times I have their menu here, reprinted from their website:

Medieval Times' noble guests feast on garlic bread, tomato bisque soup, roasted chicken, spare rib, herb-basted potatoes, pastry of the Castle, coffee and two rounds of select beverages. A full-service bar is also available for adult guests. Vegetarian meals are available upon request.

The vegetarian meal includes tomato bisque soup, garlic bread, large Portobello mushroom cap stuffed with whole grain, rice and bean blend, large skewer of roasted vegetables, hummus with pita chips, pastry of the castle and two rounds of select beverages. (Please advise your server of special meal requests once you are seated at your table.)


Then you wash it all down with a big mug of Pepsi. Rock on.

Never mind the fact that potatoes and tomatoes are native to the Americas and did not make an appearance in any European cuisine until it was brought back by the Spanish in the early 16th century. Oops?

Don't get me started on the absurdity of the garlic bread. Though it was likely cultivated before the 16th century it was still a rare ingredient in any medieval English cuisine. Coffee is equally silly.

So what do you do when you crave some real medieval fare?

Skip Medieval times and start cooking from this online cookbook. Don't worry, not every recipe requires you to swipe animals from your local park/zoo/aquarium/pet store. Several recipes use more accessible ingredients.

Take this stew for example:

vj. Beef y-Stywyd.—Take fayre beef of þe rybbys of þe fore quarterys, an smyte in fayre pecys, an wasche þe beef in-to a fayre potte; þan take þe water þat þe beef was soþin yn, an strayne it þorw a straynowr, an sethe þe same water and beef in a potte, an let hem boyle to-gederys; þan take canel, clowes, maces, graynys of parise, quibibes, and oynons y-mynced, perceli, an sawge, an caste þer-to, an let hem boyle to-gederys; an þan take a lof of brede, an stepe it with brothe an venegre, an þan draw it þorw a straynoure, and let it be stylle; an whan it is nere y-now, caste þe lycour þer-to, but nowt to moche, an þan let boyle onys, an cast safroun þer-to a quantyte; þan take salt an venegre, and cast þer-to, an loke þat it be poynaunt y-now, & serue forth.


Ability to read Middle English not so great? Don't worry, I've roughly translated it for you.

Medieval Beef Stew:

Take fair beef of the forequarters, and cut into fair sized pieces, and wash(?) the beef into a good pot. Than take the water that the beef was soaking in and strain it through a strainer(remove the scum?) and set the same water and beef in a pot and let them boil together. Than take cinnamon, cloves, mace, grains of paradise, cubebs (substitute allspice/black pepper?), and minced onions. parsley and sage, an cast into the pot, let them boil together.

Take a loaf of bread and soak it with broth and vinegar, and than draw the bread through a strainer and set aside. When the stew is nearly done, cast the bread mixture into the stew but not the bread too much (not the mulch?) and let it boil, and add the saffron and the salt. "Look (to see) that it be thickened enough and serve it forth. (With a mug of Pepsi)

Enjoy!

Oh, and if someone makes this stew and sends me photos, I will love you forever.

reade more... Résuméabuiyad

Croissants: Part Two

Back to the top 10 "Most Difficult" Recipes: #9 Croissants.
Picking up where we left off with Croissants: Part One.

Getting ill this month threw my croissant plans for a loop. I had intended to mess around with the pastry a bit (I think the hydration levels in the recipe I use could be tweaked just a bit) but that will just have to wait.

Getting ill did have another, somewhat unexpected result...

When I was bedridden with my wonderful virus, I gave Mr. Humble the chore of baby-sitting 'our' wild sourdough starter. Suddenly he became obsessed with it and with bread making. In the last two weeks he has been learning to bake with his little pot of wild yeast and gobbling his own sourdough breads fresh from the oven.

Our starter.
Nicknamed: 'Mr. Stinky'

He is prodigiously proud of the vigorous Mr. Stinky and his breads. In fact, he has started calling himself an 'artisan' bread maker. Keep in mind though, when I met my husband his cooking skills were limited to some of the worst bachelor fare on the planet. Though he has taken it upon himself to learn how to cook in the last year or so, as a way to help lighten my work load since having our daughter.

So yea my husband, the 'artisan bread maker', a title I think he adopts to tease me. In fact, he told me last week he will be starting his own food blog since he is so great. I'm not certain if he is being serious, I think he just wants to tease me about eclipsing my blog with his own.

Mr. Humble... oh sorry, Mr. Artisan Bread Maker, feel free to dazzle me with your uber-bread skills. In fact, perhaps you could inaugurate your blog with some croissants?

They're certainly a pain for me to turn out, what with my spindly arms and all. However, a man with your skills would certainly have no trouble with them.

So, the croissants.


I'm sorry it took so long to get part two posted. I've had these photos ready to go for almost two weeks. However, I really wanted to bake the third batch of dough before doing the post. When I got sick, that third batch of laminated dough sat in the fridge for a week only to be tossed. All 5lbs of dough, a full day's worth of work (sigh).

However, I do have a set of good croissants and a recipe that works to share. This is from the Culinary Institute of America's baking book, however I've changed the recipe to give correct metric weights.

CIA's Croissant Dough
adapted from Baking and Pastry: Mastering the Art and Craft
Yields 5 lb 8 oz /2.26 kg (roughly 11 Croissants)
716 grams (1.58lb) whole milk, room temperature
120 mL (4 fl oz) malt syrup
907 grams (2lb) bread flour
28 grams (1oz) yeast
113 grams (4oz) granulated sugar
142g (5oz) butter, cold but pliable

Roll in:
680 grams (1lb) butter, cold but pliable

A few notes:
If making pain au chocolate you're also going to need about 2oz of chocolate for each croissant. You can find chocolate batons made for pastry making online, I like Valrhona's Batons de Chocolat. They do make rolling the croissants easier, however you can use any semi-sweet chocolate you have lying around. I've even molded my own batons from 53% cacao chocolate.

Also, this recipe is vague regarding the malt syrup and butter. For this recipe I'm using unsalted butter and a diastatic malt syrup. For folks who are wondering what I am talking about, diastatic refers to enzymes in the malt syrup which convert starch to sugar. There are non-diastatic malts out there, which simply acts as a sweetener. Unfortunately, this recipe doesn't specify which...


Start by turning your 142g of butter into a pliable mass. I do this by loosely wrapping cold butter in parchment and then beating it with my rolling pin. Mind your overhead cabinets, this is a violent process. Once the butter is pliable but still cold you're ready to start.

Mix the yeast with the room temperature milk and allow to stand for 5 minutes.

Add the flour, sugar, malt syrup, the pliable butter broken into pieces to the bowl of your stand mixer. Pour in the yeast/milk mixture and mix with the paddle attachment until it comes together. Once it is too stiff to mix with the paddle, swap out for your dough hook (The book's recipe calls for doing the entire process with a paddle but this has to be an error as it would be murderous to any household mixer. I did it with one of my batches and I will never, ever do it again.) Mix with the dough hook for 3 minutes on medium-low and then crank it up to high speed for 2 minutes.

Line a half sheet pan (13" x 18" x 1") with a piece of parchment paper. Turn the dough out (it will be a bit sticky) into the pan and roll it out so that it evenly fills the pan.

Cover the pan with plastic wrap and then retard the dough for 5 hours or overnight in the refrigerator.

Now prepare the butter for the roll in. Take the pound of cold butter, wrap in parchment and beat senseless with a rolling pin. You want to create a pliable slab of butter half the size of your sheet pan so roughly 13" x 9". You also want a uniform thickness and no hard lumps or bumps in the butter. Hard butter can punch through the dough when rolling, messing up the lamination process. When the slab is ready, wrap the butter and refrigerate for 5 hours or overnight.


Turn your sheet of dough out of the pan, it should be puffier and less sticky from the night in the fridge. Place the butter (if it is too hard, beat it up again before doing this step) on one half of the dough and fold the dough over. Pinch the dough around the butter to lock it in, make sure the edges of your slab are straight and the corners square.

Roll the slab back out to roughly 13" x 18". (Note: It is very important to keep the dough cold during lamination. On a hot day, I deal with this by tossing a large bag of ice onto my marble pastry slab and letting it chill. I do this between each step and it keeps the dough nice and cool. Using a chilled marble rolling pin is also useful.)

Preform a four fold on the dough, folding the two narrow sides to the center and then folding in half like a book.


Poke the dough to mark what step you're on (one dimple: first set of folds, two dimples: second set of folds...etc)

Wrap the slab in plastic to prevent it from drying out and place in the refrigerator for 30 minutes. This process not only helps maintain the dough's temperature but allows the gluten to develop in such a way that it can withstand the punishment of lamination.

After 30 minutes, roll the dough back out to 13" x 18" and preform a 3 fold (like a men's wallet). Mark with two dimples and return to the the refrigerator and allow to chill for 30 more minutes.

Then preform the final three fold on the dough, wrap and return to the refrigerator for two hours.

When the two hours are up you can roll out the dough and prepare your croissants.


Roll the dough into a long rectangle (roughly 9 x 25"). For the next step I find using the wheel of a sharp pizza cutter is the best. Zig-zag the cutter over the dough creating triangles roughly 9" tall and 4" wide at the base.

Cut a 1" slit at the base of each triangle, gently stretch the points of the triangle and then roll them up on an un-floured surface. Using the heal of your hand to exert pressure and keep them tight. Place them seam side down on a parchment lined baking sheet and curve the sides inward to give them that crescent shape. Brush the croissants with egg wash (1 part egg, 1 part whole milk) and proof at 85°F/29°C until doubled in size.

After proofing, gently brush the croissants with egg wash again and bake at 375°F/191°C until well browned (Brown! Not pale gold or not golden brown. Brown), about 15-20 minutes.

Once cool, fanatically cut open all your croissants and examine the insides.


Considering the fact that I do not own an industrial dough sheeter, I think these turned out lovely. Moist, feathery interior, crisp buttery exterior. Dangerous little pastries.

Of course, not as dangerous as...

Pain au Chocolat (chocolate filled croissants)!


To do this, cut your dough into long rectangles. Place a chocolate baton at one end (or if just use chopped chocolate/chocolate chips because at this point, I was all out of batons after making 2 dozen croissants the day before) and roll the dough over it once it is completely inclosed, place a second baton down and roll the dough up completely.

Place the croissants seam side down on the baking sheet and brush with egg wash. Proof at 85°F/29°C until doubled in size.


After proofing, gently brush the croissants again with egg wash and bake at 375°F/191°C until well browned, about 15-20 minutes.

Enjoy!

reade more... Résuméabuiyad

Orange Chocolate Baked Alaska


Top 10 "Most Difficult" Recipes: #8 Baked Alaska
Total Batches: One
Time: 24 hours
Difficulty: Making it is easy, photographing it before it turns into a puddle is difficult.

Still working my way through the most difficult recipes. I've been looking forward to doing the baked Alaska, it is just so fun to make and eat.

Mr. Humble is actually pretty grumpy he isn't home right now to share this dessert. Though, I do have the components ready in the freezer for a second baked Alaska all ready to go. Maybe I could bake a second, you know, if somebody does all the dishes tonight...

Anyway, I'm not sure if this recipe deserves the title 'most difficult'. All things considered, it really isn't that hard. The trick is having everything frozen solid before covering it with meringue and transferring it to the oven. The meringue acts as an insulator and keeps the ice cream cold throughout the baking.

This version of baked Alaska uses orange ice cream atop a brownie in a pool of dark chocolate sauce. Feel free to substitute store bought orange sorbet for the ice cream if you lack an ice cream maker. You simply need to soften the sorbet/ice cream and fill a mold and let it freeze until solid (usually overnight).

Hemisphere molds are commonly used for baked Alaska. Though, once you take a simple stainless bowl and slap the name 'hemisphere mold' on it, they get expensive. I'm not really sure why, they're absurdly priced at my local baking store. However, I found some inexpensive metal bowls that can serve the same purpose at Ikea and for a lot less. Metal hemisphere molds are not a requirement for this recipe, you can chill your ice cream in any container you wish, lined with a little plastic wrap for easy removal.


The Day before:


Orange Ice Cream

Yields enough for two 5" hemisphere molds (roughly 1.2 quarts)
1 cup frozen orange concentrate
2 1/2 cups heavy cream (ideally 40% milk fat)
1/2 cup whole milk
1 cup + one tablespoon granulated sugar
1 teaspoon vanilla extract
1 drop orange gel food coloring (optional)

Place your molds into the freezer to chill.

In a mixing bowl, whisk together all the ingredients until thoroughly combined.

Add the mixture to your ice cream maker and churn according to the manufacturer's instructions.

When the ice cream is done, divide between your molds (if using a ceramic or plastic mold line with a bit of plastic wrap). Press a little plastic wrap onto the surface of the ice cream and freeze until solid (this will take at least overnight).


The Next Day:

Start by preparing the dark chocolate sauce:

Fran's Deepest, Darkest Chocolate Sauce
from Pure Chocolate
yields 1 1/2 cups
1 cup heavy cream
1/2 cup corn syrup (or liquid glucose)
2/3 cup granulated sugar
3/4 cup Dutch-processed cocoa powder, sifted

Add the cocoa to a large heat-safe mixing bowl and set aside.

In a medium saucepan, combine the cream and sugar and cook over medium heat until the sugar dissolves. Stir in the corn syrup and then bring to a boil over medium heat.

Remove from the heat and pour half of the mixture into the bowl with your cocoa. Whisk by hand until smooth and then add the remaining cream. Whisk the mixture until uniform and then strain though a fine sieve back into the sauce pan.

Cook the mixture over low heat until glossy and large bubbles form (roughly 5 minutes).

Remove from heat and allow to cool slightly. Serve warm.

Store any extra sauce in an air tight container for up to two weeks in the refrigerator.


Now you're ready to prep the ice cream (provided it is frozen solid).

Warm the molds in a little hot water to melt the surface and press them out onto a baking sheet lined with parchment paper. Or, if they were lined with plastic wrap, use that to remove from the mold.

Place the unmolded ice cream into the freezer once again and chill until solid.

Bake a pan of brownies (I'm using Ghirardelli brownie mix because I'm an unforgivably lazy food blogger today) and cut out 5" rounds, one for each mold. Allow to cool to room temperature and then transfer to the freezer for 30 minutes.

When the 30 minutes is up, preheat the oven to 345°F and whip up the meringue.

Meringue
yields enough for two 5" baked Alaskas
6 egg whites
1/4 teaspoon cream of tartar
2/3 cup granulated sugar

In large bowl, beat egg whites and cream of tartar with electric mixer until foamy. Gradually add sugar, beating until mixture forms stiff but still glossy peaks.

To assemble the baked Alaskas, place the brownie onto a baking sheet lined with parchment. Working quickly, top the brownie with the orange ice cream and slather on a thick layer of meringue.

Now some freeze the baked Alaska for a couple hours before baking. However I don't like my meringue frozen, so I bake immediately for 10 minutes or until the meringue has a golden blush. If you're ice cream is solid and you work quickly, baking it immediately will not be a problem.

To serve, coat a plate with the prepared chocolate sauce and place the baked Alaska in the center. Serve immediately.

One 5" baked Alaska should serve 2-4.

reade more... Résuméabuiyad

Vanilla Bean Chocolates


Mr. Humble bought me a new cook book! A lovely book on making artisan chocolates. I'm not sure if it was a 'gift' so much as payback for all the pastry I've been making him eat.

He knows I have a weakness for chocolates, one that I usually manage by keeping them out of the house and averting my eyes when I drive past a See's Candy store. Now I'm dealing with the discomfort of stifling the urge to go buy a 10lb block of chocolate because of this new book. One that would lead to a candy making spree and a brand new pants size.

Yea, this is most certainly some sort of payback.

So I've been reading this book and I really like it, not just for the recipes but for the technical information that makes up almost half of the total pages. The book sets you up with the know-how to create beautiful chocolates from your own flavor combinations. See why this is so troublesome for me? I can barely resist the urge to start inventing my own chocolates.


Anyway, I really like the book so I felt it deserved noting on the blog. It covers truffles, molded chocolates and the hand dipped variety. His recipes are modern (woo!) and sound delicious (salted caramel, raspberry-wasabi, ginger crunch). He illustrates several techniques to create, decorate and even how to make your own decorative transfer sheets (double woo!).

Also, he talks about how to avoid mold and spoilage in your truffles, something not discussed nearly enough in home candy making. If you're looking for a single book to get started in chocolate making, this one gets the Humble stamp of approval.

So I tried one of his recipes myself today. I had a surplus of white chocolate and plenty of plump vanilla beans so I selected his recipe for vanilla chocolates.

Vanilla Bean Ganache

Each of the book's chocolate recipes have a rating, from easy to difficult. These vanilla truffles are marked easy and they really are. Best of all they're smooth, creamy and fragrant with vanilla.

Vanilla Bean Chocolates
from Making Artisan Chocolates
Yields roughly 28-30 chocolates

For the Chocolate Shells:
2 pounds (906g) 29 percent white chocolate, tempered

For the vanilla bean ganache:

6.5 ounces (182g) 29 percent white chocolate, chopped
1/3 cup (77g) heavy cream
2 vanilla beans, seeds reserved
1 1/2 tablespoons (21g) salted butter, cubed and soft but not melted

To finish the chocolates:

8 ounces (224g) 29 percent white chocolate

Fill the molds with the tempered white chocolate, giving them a gentle shake to ensure the chocolate is coating evenly. Dump the excess chocolate back into the bowl, giving the mold a few taps with a wooden spoon to help it along.

Lay out a sheet of parchment paper and lay the mold onto it upside down. Once the chocolate has begun to thicken and set, scrape the mold with a chef's knife to remove the excess chocolate.

Return the mold to the parchment and allow to set completely before filling with the ganache.

To make the ganache, place the chopped white chocolate into a heat safe bowl. Heat the cream and vanilla bean seeds over medium heat until it begins to simmer. Remove from heat and cover for 15 minutes so the vanilla can infuse the cream. Place the pan back on the stove and bring to a simmer once again. Immediately pour the cream through a fine sieve into the bowl with the chocolate and allow to stand for 2 minutes.

Stir the mixture until smooth. Allow to cool (about 95°F, still fluid enough to pipe but not so warm that it will melt the molded shells) and then fill a piping bag or plastic baggie with a cut corner and fill the molded shells three-quarters full. Gently tap the mold against the counter to release any air bubbles.


Allow the shells to sit for about 30-60 minutes, until the ganache has cooled and set up.

To finish the chocolates, ladle more of the white chocolate over the mold, scraping off the excess. Allow the chocolates to cool completely and harden before inverting and taping them out of their molds.

(Then eat most of the chocolates all by yourself and send Mr. Humble irate text messages 'thanking' him for the new book.)

Enjoy!

reade more... Résuméabuiyad

Raspberry Ginger Ice Cream Float


Spring is officially here and I'm feeling it.

I spent the weekend cleaning. Reorganizing the Humble pantry, finding rogue splatters of macaron batter in the kitchen and attempting to remove it without the aid of a chisel.

I'm also craving warmer weather desserts, like yummy ice cream floats. Of course, since buying a new ice cream maker, I now have plenty of ice cream around that needs a use. Today's Raspberry Ginger Ice Cream Float is Mr. Humble's favorite (that man loves ginger), creating a frosty drink that is creamy, spicy and tart. Sounds interesting, right?

It is and it is good.


This is my easiest ice cream base, a simple mix of fruit, milk, cream and sugar that never lets me down. It requires no cooking, uses no eggs and is ready to churn in less than 5 minutes.

For the non-ginger lovers, you're welcome to omit the candied ginger. Just substitute a teaspoon of vanilla extract for an equally delicious, creamy raspberry ice cream (Try topping it with a cream soda for an amazing float).


Not So Humble Ginger Raspberry Ginger Ice Cream
yields 1.2 quarts
2 cups frozen raspberries
2 cups heavy cream (I'm using 40% milk fat)
1/2 cup whole milk
1 cup plus one tablespoon sugar
1 tablespoon candied ginger, finely minced

Toss the raspberries into your food processor and blend until pebbly. Add the sugar and the milk and mix until a slurry forms. (You can strain this mixture if you want a smoother ice cream, however I actually like having the seeds in there.) Add the heavy cream and then blend for a little under 10 seconds. This beats a little air into the ice cream and results in a smooth, creamy and easier to scoop ice cream.

If you're working with frozen berries and chilled ingredients, the mixture is ready to be added to your ice cream maker now. If you substituted fresh berries, chill the mixture in the refrigerator for roughly 30 minutes before churning.

Add the mixture to your ice cream maker and follow the manufacturer's instructions. During the last few minutes of churning, add the finely chopped ginger.

Pour the finished mixture into a container and chill for at least an hour, until firm.


This picture brings out my inner girlie-girl. I love this color.

Okay, turning this into a float...

Does making a float require instructions? Well for those in need of directions: take a couple scoops of the ice cream and top with ginger ale or ginger beer (these are non-alcoholic beverages, mind you).


Pour slowly as it will foam up.


Serve it up in a tall glass with an old fashioned spoon-straw and you've got that ice cream parlor experience right at home.

For an even prettier presentation, toss a couple fresh/frozen raspberries into the bottom of the glass before adding the ice cream.

Enjoy!

reade more... Résuméabuiyad

Jour du Macaron (Macaron Day)


Happy Macaron Day everyone!

This year macaron day falls on a Saturday, which is unfortunate since I'm not in the habit of blogging on weekends. However, I couldn't just let it pass unmarked so here I am, prying myself away from my usual weekend chores (WOO!) and yes, I have macarons.

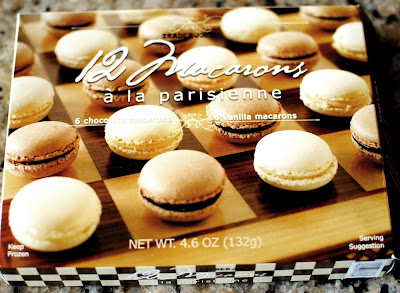
Though, I didn't bake these macarons. I bought them! No, not at a fancy bakery, at Trader Joe's. Yes, the quirky little grocery chain with ceder walls and Hawaiian shirt garbed crew. That Trader Joe's.

I was there today stocking up on my usual TJ's staples and lo and behold in the freezer case I notice a box of Trader Joe's macarons! Of course I was instantly curious about mass produced macarons. It is my macaron fanatic duty to test any that I come across.


So after a long morning of errands I get home to a nicely defrosted box of macarons which I immediately tear into.


Awww, some of my macarons are smooshed. Oh well, they're delicate cookies and that they're not all mangled is probably a blessing.

So I dig in. Happy Macaron Day to me!

Naturally the first one gets sliced open with a sharp knife, I want to see the interior of this cookie.


Ah ha! Air pockets. I'm feeling better now. They're small pockets though and the shell does contain a nice fluffy interior.


So I try the chocolate. It's not too bad, the texture is better than expected for a frozen/defrosted macaron. The shell is fairly crisp and the interior is nice, though a tad chewy. Forgivable since these are chocolate macs, the addition of cocoa does change things a bit.

The flavor is nice and I like that it isn't too sweet.

Next I try the Vanilla.


These are quite nice. I'm pleasantly surprised by the light and delicate texture. Not bad for a mass produced frozen macaron. The taste is sweeter and a bit reminiscent of vanilla filled wafer cookies. Not a bad association because I love wafer cookies, though that particular flavor is a little unexpected.

Overall I like the light and custardy taste of the vanilla, a bit more so than the chocolate. (Though I certainly wouldn't kick the chocolate out of bed.)


Verdict: I'm not going to go all food snob on these macs, I actually liked them. They were far better than expected (Though I admit to having pretty low expectations going in). Would I buy them again? Probably not, after all I can easily make them fresh from my own oven and frequently do.

However if I lost both my hands in a freak llama attack and I was doomed never to bake again, then yes I'd probably make a point of picking these up.

http://www.traderjoes.com/
Price: $4.99 for a dozen
(Rumor has it they are not available at all locations, so call ahead if you're planning on making a long trip.)
reade more... Résuméabuiyad