Chocolate again today! In fact, we're making candy bars at the Humble household.
Over the last year I've noticed an increasing number of custom candy bars being offered online. Candy makers have finally put a choke hold on chocolate lovers by offering to craft their ultimate, personal chocolate bar. Who can resist that?
Chocolate, any way YOU want it. To think, for so many years I raged at the world for denying my cravings for chocolate with chili and gummy bears. Now the retail market is finally reaching out to me and my bizarre cravings.
Of course, making personalized chocolate bars is something that we've had the ability to do for ages. It doesn't require a lot of specialized equipment, just a little time, a lot of chocolate and a dash of know-how.
Really, the only tool you will need is a chocolate bar mold. I have a single large break-apart chocolate bar mold that I use for my candy-bar making. They're cheap--a couple dollars--and will give your candy a nice professional look.
Occasionally though, you'll hit on something that has a little appeal… like a s'mores candy bar.
**A warning though, owning a chocolate mold may turn you into Willy Wonka--only crazier. Yes, that IS possible--and you may start inventing candy bars that only a mother could love.**
Occasionally though, you'll hit on something that has a little appeal… like a s'mores candy bar.
S'mores Chocolate Bars
this should yield 2-3 bars, depending on your mold's dimensions
1/2 pound milk chocolate
1 jar marshmallow fluff
dozen graham crackers
Special tools:
chocolate bar mold
kitchen torch (optional)
The first thing you need to do when making candy bars is temper the chocolate. This is where the science comes in. When you buy a good quality bar of chocolate or a molded chocolate from a candy shop you'll notice it has a nice hard, glossy finish and will break with a clean snap. Tempering is the process that creates this finish. Without it, you'll have a whole host of problems: The chocolate may never set up at room temperature. It may become hard but will look dull and blotchy. You can have blooms of fats and sugar on the surface of the candy. Worst of all, the chocolate might not pop out of your mold.
That's bad.
To prevent this you need to coax the cocoa fats into a specific structure that stabilizes the chocolate. This is done by regulating the chocolate's temperature and rather than write endlessly on how to do this, I'm going to post a video and then go do some laundry. Blogger cop-out for sure, but hey... I don't have any clean towels.
Tempering Chocolate (In the Microwave) with Jacques Torres
Thank you Jacques!
So, once you have your bowl of tempered chocolate you're ready to start candy making. The easiest method of making custom candy bars is to fill the mold 3/4's full and then poke any dried fruits, nuts, confections, cookies, cereals etc into the wet chocolate and allow to set.
So if this method of making the candy bars seems a little overwhelming or bothersome, you can still jab mini marshmallows and graham cracker chunks into the chocolate to make a simplified version of this candy bar.
Now onto making this S'mores Candy bar:

Ladle in the tempered chocolate and fill the mold. Grab a chef knife or large spatula (the sort you use to frost cakes) Turn the mold over the bowl and tap the back of the mold with the back of your chef's knife to remove the excess chocolate. This will create a hollow chocolate shell to contain all the s'more goodness. Allow the remaining chocolate in the mold to set until firm and glossy.
Meanwhile, spoon your marshmallow cream onto a plate or bowl and grab your kitchen torch. Toast the surface of the cream and then stir. Repeat several times until the cream has the flavor of toasted marshmallow. (You should be able to get the same effect using your oven's broiler, just watch it carefully.)
Allow the marshmallow cream to cool completely before the next step.

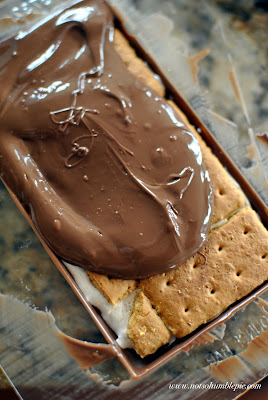
Spread a layer of cream into your set chocolate mold. Press a single layer of graham crackers down onto the cream.
Pour a layer of tempered chocolate on top to seal the candy bar. Tap the bar on the counter to release any air bubbles and then scrape off the excess with the back of a chef's knife.

Allow the chocolate to set completely before un-molding. Breaking and eating.
Enjoy!


No comments:
Post a Comment